Tuesday, May 24, 2011

Shadow Sew Box

I love a good challenge and a Friend had given me this little box and said I would love to see what you can do with this. So what do I love but to sew and this was a perfect way to display what I enjoy doing. The little girl was from b-line stamps and she is sitting on a wood spool that my Darling Hubby cut in half for me. I used a thimble and iron from (you got it) A Monopoly game and scrabble tiles the hugh dress form is from Tim Holtz dies. The box is small and came from the dollar store. I am hooked I had to go and get more I am thrilled to make a bunch more and I am almost done with the second one. 


Sunday, May 8, 2011

Stationary sets


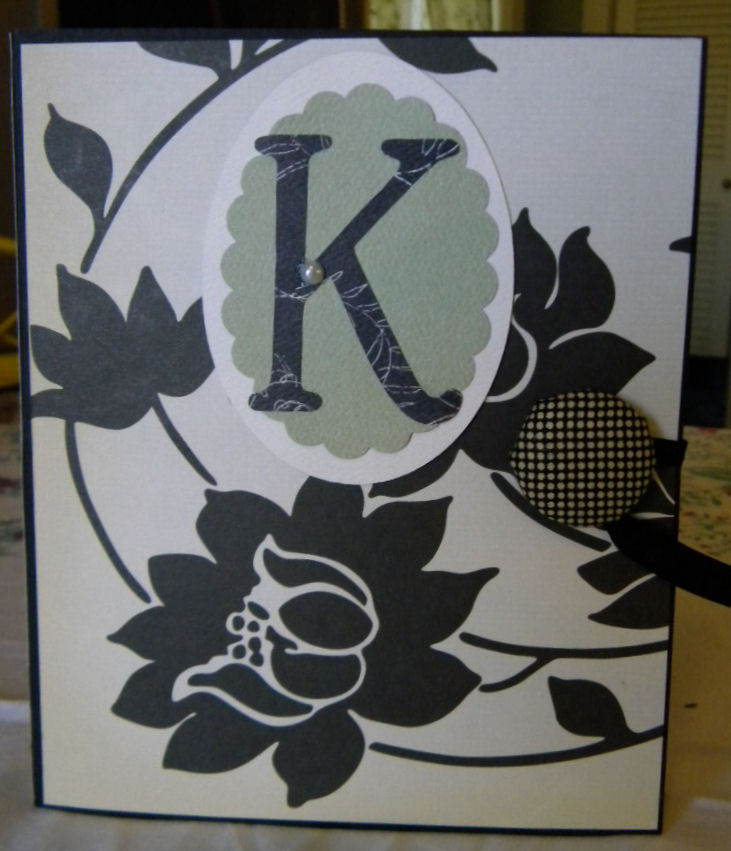
A while back a made a lot of stationary envelope box sets and I felt it was time to share with all of you. I have made and quite a few of these and with the Martha Stewart score board and envelope tool it was easy enough and a lot of fun to create. I made one for my Sister in law for her birthday last year and everyone fell in love with them and I got a lot of orders for Birthday's and Christmas and I really loved making them. Since I first started I have made some adjustments and made them a little more tailored. I use my slice for cutting my Monograms. This is the first one I ever made for Sharri (my sister in law)


The next set I made was for My (Brother in law) Steve's friend Dale, which he needed for a birthday gift. I fell in love with all my stationary boxes and almost hated to give them up. But then I just got into wanting to create more and no two are ever alike.
This last picture is a little blurry sorry about that.

This is another set that I made for Dale. (God love him and Steve for every time they ordered one it made my day I would get excited like a school girl.) I love to get into the creating of a new and I am always excited to see how they are going to turn out myself. I do have some favorite ones and I keep telling my self I am going to create another just like it but I never have the heart to do that. It is just one of a kind and to me that makes it even more special.


Here are some other ones that I made. I also make my own brads to match.


This last box at the bottom of each card I stamped the saying
"With GOD all thing are possible"
 If you are interested in a set please mail me at jesssews@gmail.com

Happy Mothers Day

Happy Mothers Day MOM and a Happy Mothers Day to all of you. I pray that you are having a wonderful day. Abby gave me a wonderful letter and a card that said she cared about me. That of course made my day. 

Wednesday, April 6, 2011

Abby's Easter Card

This the First stamp that Abby Picked out and asked me to get to make her a card. How Surprised she will be to get her card on Easter. The Stamp is by Mo Manning called Birthday Fairy Lee. I stamped and it out and cut out around the stamp leaving a slight border around. The Circle flower and Eater is cut on the Slice. The Flowers are Tim Holtz tattered Flower Die. Paper is October Afternoon.


Sunday, April 3, 2011

Slice Love Part 3

Now for the rest of the story (haha) .
I always did like Walter Cronkite...
 Wow I have seen so many cool Cards and books out for the Cricut and I was feeling a little left out. You see I don't own a Cricut.  As you call see by my blog name I have a SLICE! I have had some friends tell me I should get one but They take up so much room and I have invested in a lot of design cards for My Slice. But I will see a card that I really like and find out that the person had used their Cricut or spellbinders (mind I do have spellbinders and love them but this is about the Slice) and I will tell myself I can do that using my Slice. I love my slice and all the design cards that Making Memories have come out with. OF course I am still always wanting more but then who doesn't. So I have decided for the Love of Slice I was going to making some cards using no other die cuts but theirs. From my 2 earlier posts at you can see I just a bunch of frames for the Cameos and at times I did hit a little road block but the challenge made it all the more fun.
SO how i have created two kids cards using of course the slice a birthday greeting stamp and one embossing folder.


 Little miss Monster or is she and Alien oh what does it matter she so stinking CUTE! With was a fun card to make. I made an A2 card and matted on top with the red just 1/8" smaller then I cut the white to the size that I wanted and I did cut a few extra to have on hand in case I made a mistake. So I line up the white piece of card stock on my slice mat and used Falala design card and cut the #7 at 2 1/2" I got it right where I wanted it the first try and added paper to the back. ( This is what challenged me I saw someone had done this using the Cricut so I knew I was going to have to try using the Slice.) For the edge border that looks like a cloud was cut form the Greeting design card at 3 1/2". The balloon was cut using the Parties card cut at 2". For my Monster she is from the Playtime Fabrique design card cut at size # 3. Ok If you have not gotten and Fabrique design cards yet I tell you what I have fallen in love with them there are 6 different sizes and for the monster since I used Size #3 she is 2.6"wx2.8"h ( for scrapbooker is you wanted her even bigger and this is great size #6 is 4.1"wx4.6"h. what a great feature this is.)
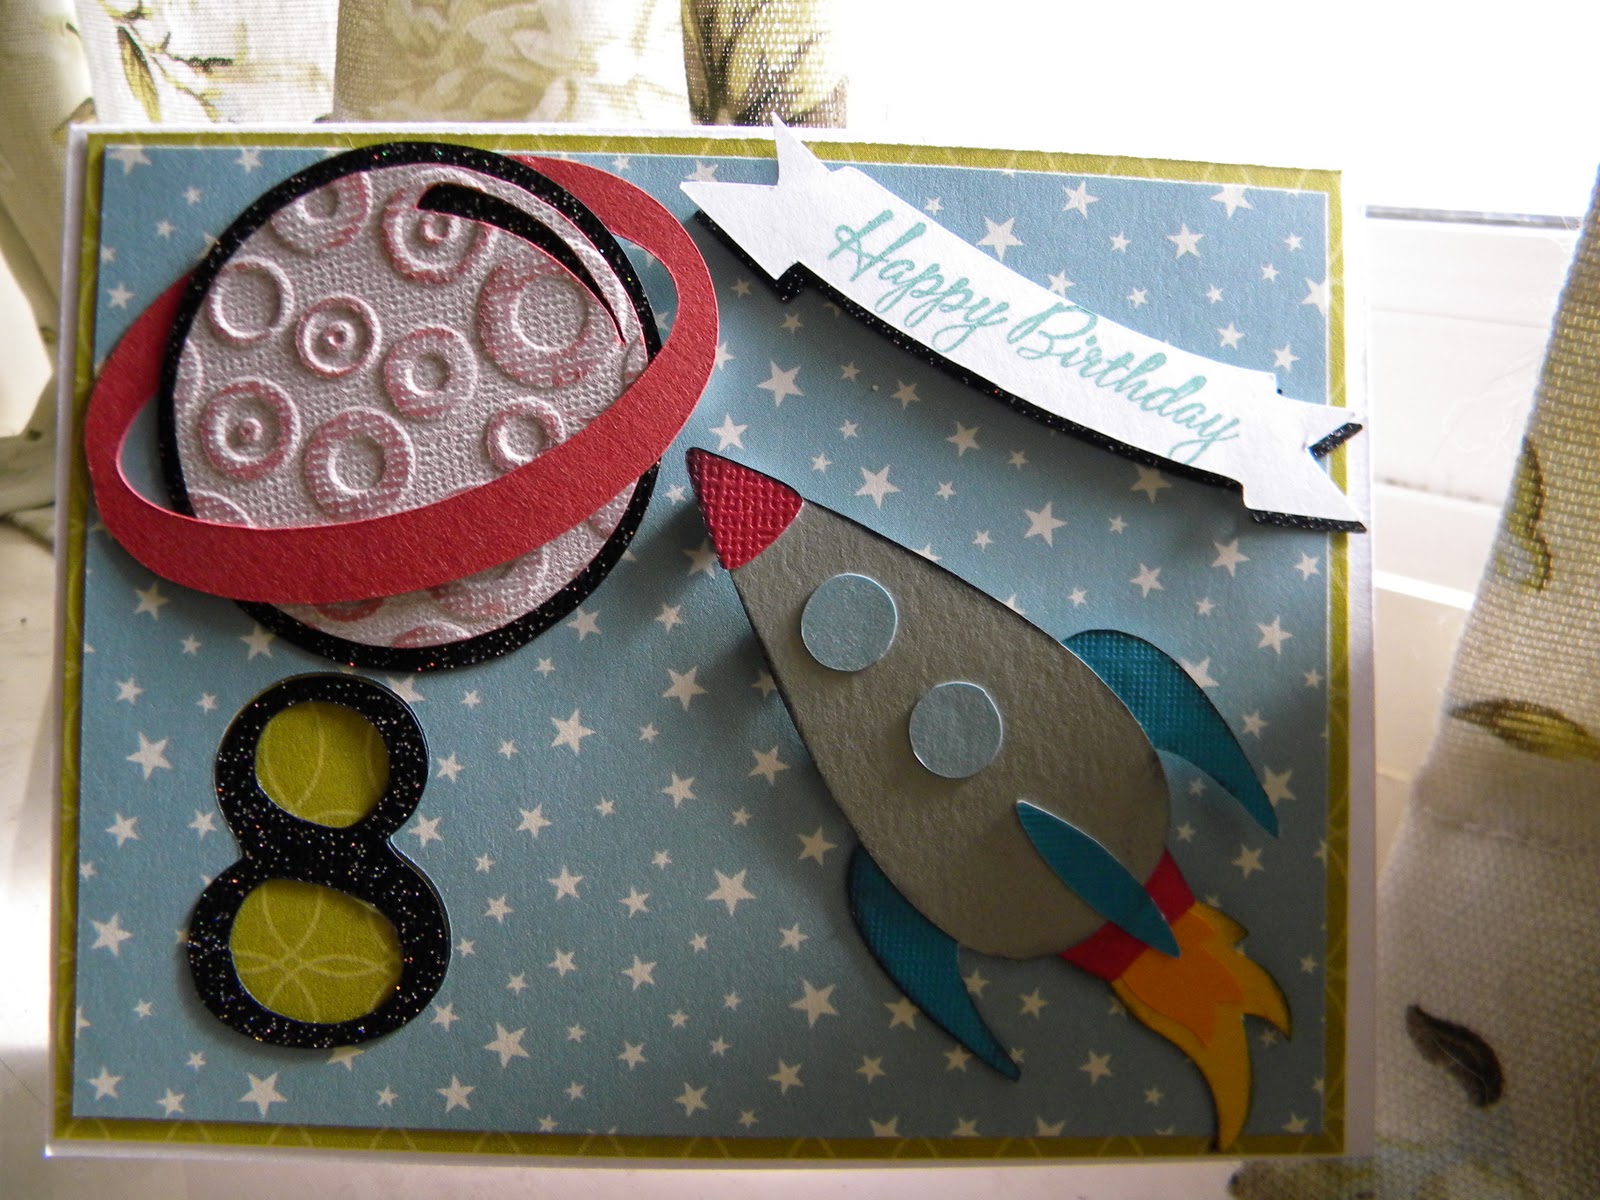
For the Rocket man card I did the same thing with the #8 that I did with the #7 on the monster card. but I did cut the #8 out in the black glitter and layer it on top or it would look like an eight. The #8 was cut from Think Pink design card at 2 1/2" for the planet Saturn I cut the bubble and shadow at 2 1/2" and for Saturn's ring I used the letter O cut at 3 1/2" from Home Sweet Home design card. The Rocket is the design card Playtime as well cut at size #2. I pop dotted only half of the rocket and Saturn so it gave it the look of motion.
Thanks for looking and Enjoying the fun Ideas from My Slice!

Slice Love Part 2

Cameo Card #2 This Cameo reminds me of Barbie.
What a great birthday card it made. I really wanted to keep both simple and clean. A little understated yet still very girly.
All the frames and flower are die cut from the Greeting Slice design card. The first frame and shadow are cut at 3 1/2". The next frame and shadow are cut at 3".
On the base of the card for Happy Birthday the first frame and shadow are cut at 3" the next frame and Shadow are cut at 2 1/2". For the flower I cut it twice at 2 1/2"


Saturday, April 2, 2011

Slice Love

It is time for some Making Memories Slice Love.
I have created two Cameo cards using Slice Design cards. I really love these silhouette stamps from Hero arts and what a perfect way to use them than with slice frames. I have had some issues with my slice but Making Memories has been wonderful Thank you Valeria for all of you help. So to give back some love I have created a few cards to share using Slice design cards for all of my die cutting.

Happy Mother's Day Twisted Easel Card
For the card I Used Slice Design card Remember This. The frame and shadow is cut at
3 1/2".  Under the next two frames is from Studio Essentials scalloped frame cut at 3 1/2" and 4" (this card does not have the Ms+ or Mirroring and shadow.)
The Happy Mothers Day frames are cut using the Paper Reverie the frame and Shadow is cut at 3 1/2". 
I used Basic Grey Paper Hello Luscious 6x6. I also used 1/8" thick pop dots.

Saturday, March 5, 2011

Spring time in Paris

OK With out any further ado here are My Spring time in Paris cards. I have been trying to get them up all week, However with all the rain and flooding that we have had it has been a messy week. I have had to mop up water twice and there is nothing that can be done to stop the flooding in my family room until late spring. Once the rain stops and it gets warm we can try and fix the problem for good, Abby keeps saying we have a river flowing in our family room.
Happy Birthday

Paper- Hero Arts polka dots – Memory Box Pixie 6x6
Stamps- Memory Box Eiffel Tower, Birch Branch – MFTS Meet me at the cafĂ© – miscellaneous B-day
Making Memory Slice design card Remember this Word bubble 2”
Zig Markers for Birch Branch
Distress ink Bundled sage for Eiffel Tower
Lets do lunch

Paper- Hero arts polka dots- October Afternoon Beach chair both sides- Echo Park for the record
Stamps- Memory Box Eiffel Tower, Birch Branch, Journey collage – MFTS Meet me at e cafĂ©
Markers tombo 281 & 321 – Zig Brown _ Copic powder pink, sand, butter cream
Paper piecing
Bon Voyage

                     Paper- Memory Box Pixie 6x6
Stamps – Memory Box Eiffel tower, birch branch, Journey collage –
MFTS Going Places
Ribbon & Lace
Zig markers pink and brown


Celebrate the Journey
  Paper Card stock only
Stamps - Memory Box Eiffel Tower, Journey collage, Birch Branch - MFTS Going Places – Hero Arts Bicycle
Making Memory Slice Basic Elements 1st Tree 3” and 2 ½”
Cuttlebug embossing folder swirls
flower soft
See Bendy Fold Card tutorial for info on making this card.
What a great card this was to make and a Lot of fun too .


Thinking of you Bon Ami
Paper- Echo Park
Stamps- Eiffel Tower, Birch Branch, Journey collage – MFTS Meet me at the CafĂ©
Card is gate fold 8 ½ x 5 scored on Martha Stewart score board @ 2 1/8 & 6 ¾
Making Memory Slice Turkey Daze Tag 2 ½” Banner 3” – Applique Basics Scallop oval 4” Oval 3 ½

Thursday, March 3, 2011

I Want to color Eggs Mommy.

So this is what Abby had to say to me when I boiled eggs. I want color eggs today. This was Fri Feb 25 all the kids in Huber here out of school due to bad weather. So I told her sure why not might has well have something to do other than watch TV. So we colored EGGS...  So I forgot to get Pics of her coloring the eggs however I did get a great Idea. I ran and got her a piece of water color canvas paper and an old paint brush and let her have it painting with the egg color dies.

I mean why not it was way cooler than using finger paint and the colors where so brightly pastel and the color was not going to fade like finger paint. My Mom and I where so surprised by how bright and pastel the color where. She got the biggest kick out of her hands being stain with the die all different colors. But that didn't  last, by the next day her hands where back to normal.

Thursday, February 24, 2011

New Card for Simply Scrapbooks Design Team


                                              Is Easter Here YET?
This is the question I keep here from Abby. I am not sure why but then who knows what goes through the minds of wee babes. So I have my new set of cards made up for Simply design team and I did have spring in mind. I know I am NOT alone in wanting warmer weather and wanting it NOW... Since we still have a little way to go enjoy this set of cards because the next set well make you want to cry out for spring time in Paris.......
THANK YOU
Thank you Rose card

A2 Paper memory box 6x6 pixie
Stamp memory box wild rose 3 times
w/ distress ink shabby shutters
Stamp hero arts thank you and mat add 3 scallop borders at bottom
MFT Die-namics large rose using felt
For leaves use 4 point flower fold leaf in half glue together
OOOH spring is in the air I can almost smell the rose.


 Miss You

Paper October afternoon
Fold a2 card fold at 3 ¾ then die cut edge of card using Tim Holtz edge die
Emboss with Swiss dots on front and edge
Add 2 scallop borders
For rosette cut a strip 12x1 ½ and score every ¼

Flower slice basic shapes 1 cut at 3”
Circle cut at 2”
Stamp hero arts type writer with distress ink black soot color w/copic BG13 mint green
Stamp memory box Vintage notes w/black soot and distress w/ antique linen

Thank
you Butterfly banner
Paper Crate paper restoration, Echo park sweet summer time
Banner MFT Die-namics banner
Slice parties card butterfly 3 ½
Hero arts typewriter stamped in distress ink black soot colored w/ copic RV11 Pink
Hero Arts thank you stamp in black soot and stamp memory box wild rose stamp in distress wild honey


                              Thank you
Going to school
Paper memory box pixie and October afternoon
Rickrack
Banner from slice toil and trouble 1”
Thank you stamp from hero arts stamp and cut apart
Add four scallop borders (I did this to use up scraps)
Doodle with favorite pen I used zig black
Doesn't look like these cute kids are walking to to school on a fine spring morning?


Thank you
rosette typewriter and butterfly

Paper Basic grey curio, Cosmo cricket something true
Fold a2 card fold at 3 ¾ then die cut edge of card using Tim holtz edge die
Then add two borders from the same die on short edge
Stamps hero arts thank you and typewriter colored w/copic orange, Memory box vintage notes and wild rose
Distress ink walnut, wild honey and antique linen
Rosette 12x1 ¼ -1/2 fold, punch circle and die cut butterfly

Bird 
 you’re always so thoughtful
Paper Basic grey curio 6x6
Stamp memory box vintage notes and wild rose
Hero Arts thank you and cut apart and use you’re always so thoughtful
Distress ink black soot and wild honey and antique linen
Slice noteworthy 3 ½, Bird paper reverie 2 ½
Lace


Thanks for stopping by and checking out my latest for the design team. Please keep checking in the next stop will be spring time in Paris doing lunch at a cafe. HINT HINT....